


Step-by-Step Migration Guide:
WooCommerce to Shopify
Migrating your store might seem daunting, but with proper planning and the right tools, it’s a smooth process. Follow this step-by-step guide to ensure a successful transition.
Schedule a Call
Step-by-Step Migration Guide: WooCommerce to Shopify
Step 1
Preparing for Migration
We Value Each Person: Every individual matters—whether they're a team member or a client. We respect and support everyone to help them grow and succeed.
Step 2
Exporting Data from WooCommerce
We Value Each Person: Every individual matters—whether they're a team member or a client. We respect and support everyone to help them grow and succeed.
Step 3
Importing Data into Shopify
We Value Each Person: Every individual matters—whether they're a team member or a client. We respect and support everyone to help them grow and succeed.
Step 4
Store Design & Customization
We Value Each Person: Every individual matters—whether they're a team member or a client. We respect and support everyone to help them grow and succeed.
Step 5
Configure Payment & Shipping
We Value Each Person: Every individual matters—whether they're a team member or a client. We respect and support everyone to help them grow and succeed.
Step 6
Testing & Launching
We Value Each Person: Every individual matters—whether they're a team member or a client. We respect and support everyone to help them grow and succeed.
Step 7
Post-Migration Optimization
We Value Each Person: Every individual matters—whether they're a team member or a client. We respect and support everyone to help them grow and succeed.
Step 8
Power your Step - Get in touch
Power Commerce handles every step—from data export to store design, payment setup, and optimization—so you can focus on growing your business.
Step 1
Preparing for Migration
Step 1 focuses on laying a solid foundation for a smooth WooCommerce to Shopify migration. Begin by backing up your entire WooCommerce store—this includes exporting all products, customers, orders, and media files, ensuring your data is safe and retrievable. Carefully review your current data structure, paying close attention to product categories, tags, custom fields, and any plugins that might impact the migration. Next, evaluate Shopify’s available plans (Basic, Shopify, Advanced, or Plus) to find the best fit for your business goals. Lastly, browse Shopify’s Theme Store, select a mobile-friendly theme aligned with your brand, and install it, ready for customization.
Backup WooCommerce Store:
Export complete database (products, customers, orders, media).
Save backups locally and/or on cloud storage.
Review Data Structure:
Check how products, categories, tags, customers, and orders are organised.
Identify any custom fields or plugins affecting product data.
Choose Your Shopify Plan:
Evaluate Shopify Basic, Shopify, or Advanced plans based on sales volume & features.
Consider Shopify Plus if you need enterprise-level support.
Select & Install a Shopify Theme:
Browse Shopify Theme Store.
Choose a theme that matches your brand style and is mobile-friendly.
Install and prepare for customisation later.
Step 2
Exporting Data from WooCommerce
Export Key Store Data:
Products (name, SKU, price, description, images).
Customer records (name, email, address).
Order history (order number, payment status).
Coupons and discount codes.
Product reviews and ratings.
Use Export Tools:
WooCommerce built-in CSV exporter.
WP All Export plugin for detailed, custom exports.
Save Media Files Separately:
Download all product images, banners, and media file
Organize them in folders for easy upload to Shopify.
Step 3
Importing Data into Shopify
Use Shopify’s Import Store Tool:
-
Go to Shopify Admin > Settings > Import Store.
-
Select WooCommerce as the source platform.
Upload CSV files for products, customers, orders.
Consider Third-Party Migration Apps:
-
Tools like Cart2Cart, Matrixify (Excelify) for automated bulk transfer.
Manual Adjustment:
Review product listings, categories, tags.
Re-upload product images, banners, logos.
Fix formatting issues (pricing, descriptions, variants).
URL Redirection:
Set up 301 redirects from WooCommerce URLs to Shopify URLs to preserve SEO.
Step 4
Store Design & Customization
Use Shopify’s Import Store Tool:
-
Go to Shopify Admin > Settings > Import Store.
-
Select WooCommerce as the source platform.
Upload CSV files for products, customers, orders.
Consider Third-Party Migration Apps:
-
Tools like Cart2Cart, Matrixify (Excelify) for automated bulk transfer.
Manual Adjustment:
Review product listings, categories, tags.
Re-upload product images, banners, logos.
Fix formatting issues (pricing, descriptions, variants).
URL Redirection:
Set up 301 redirects from WooCommerce URLs to Shopify URLs to preserve SEO.
Step 5
Configure Payment & Shipping
Set Up Payment Providers:
Enable Shopify Payments for easy credit card processing.
Integrate third-party gateways like PayPal, Stripe, Amazon Pay if needed.
Test transactions to ensure proper setup and security.
Configure Shipping Settings:
Set up shipping zones (domestic, international).
Define shipping rates (flat rate, weight-based, carrier-calculated).
Connect with carriers like UPS, FedEx, DHL for real-time rates.
Set Up Taxes:
Enable automatic tax calculation based on location.
Review regional tax requirements (e.g., VAT, GST).
Step 6
Testing & Launching
Test Store Functionality:
Place test orders using Shopify’s Bogus Gateway or real transactions (then refund).
Test cart functionality, checkout flow, and customer notifications.
Ensure payment, shipping, and tax settings work correctly.
Mobile and Browser Testing:
Verify that your store looks great and functions on different devices (desktop, tablet, mobile).
Check compatibility across major browsers (Chrome, Safari, Firefox, Edge).
Launch Checklist:
Disable password protection in Online Store > Preferences.
Connect your domain (buy a new one or transfer existing).
Submit your sitemap to Google Search Console for SEO.
Step 7
Post-Migration Optimization
Review and Optimize Product Listings:
Double-check product descriptions, images, prices, and inventory.
Add SEO meta titles and descriptions to products and pages.
Install Key Shopify Apps:
Apps for reviews, upselling, email marketing, loyalty programs, and analytics.
Set Up Analytics and Reporting:
Integrate Google Analytics 4 and Facebook Pixel for data tracking.
Use Shopify’s built-in reports to monitor sales, customer behavior, and traffic.
Optimize for Speed and Performance:
Compress images, minimize apps, and enable lazy loading for faster loading times.
Step 8
Power your Step - Get in touch
Power Commerce handles every step of your WooCommerce to Shopify migration—from data export and store design to payment setup, testing, and post-launch optimization. Our expert team ensures a seamless, stress-free transition so you can focus on growing your business.
Need Help?
Get in touch with Power Commerce for tailored migration services, expert advice, and long-term success strategies.

Ready to power up your online store?
Unlock dedicated support to shape an incredible future with solutions crafted for scale and innovation.
Let’s WorkPOWER your ecommerce with our weekly insights and updates!
Stay aligned on what's happening in the commerce world
Comparison
WooCommerce vs Shopify
Our WooCommerce to Shopify Complete Guide provides a clear, step-by-step roadmap to help you seamlessly transition your store without disruptions
Comparison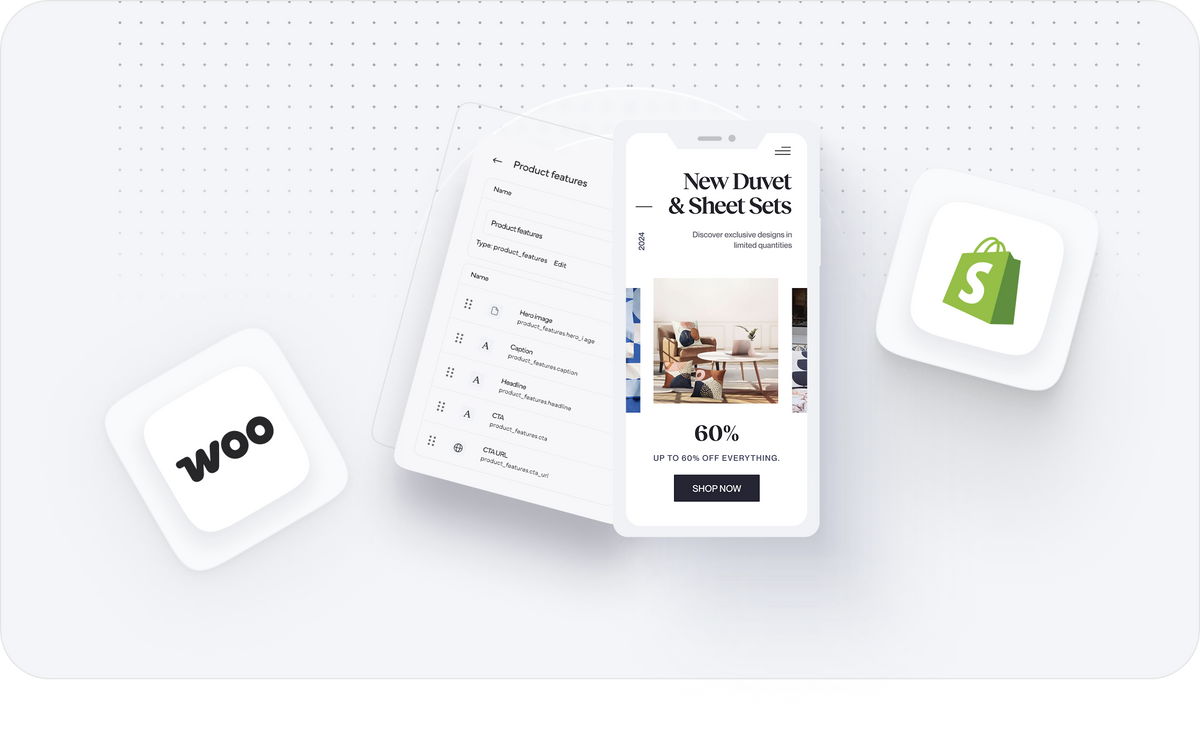


Trusted by 1000+ innovative companies worldwide